Canvas Template
A Canvas Template has been designed to help faculty create a course space efficiently. It supports various types of instructional modes (hybrid, flipped, synchronous or asynchronous online) to meet your teaching goals. Please scroll down to learn how to utilize this template and to view the download instructions. The DTEI instructional designers are also available to help you. Please schedule a DTEI office hour appointment or contact us at dteisupport@uci.edu.
View the Template
Best Practice Guidelines
Edit the Template
Downloading and Importing the Template
Follow these step-by-step instructions to import the template into a Canvas Sandbox. You can then choose the sections of the template you would like to import into your course. **Note: We DO NOT recommend importing the entire template into an existing course with developed content. It is best to import the template into an empty course shell or Canvas Sandbox.
 10 Week Template
View the Template | Download the Canvas Template
5 Week Template
View the Template | Download the Canvas Template
**Note: We DO NOT recommend importing the entire template into an existing course with developed content. It is best to import the template into an empty course shell or Canvas Sandbox.
Set up a Canvas Sandbox and Import the DTEI Canvas Course Template
- Use the links above to download the appropriate Canvas Template Export File. The file is in .imscc format (Do not try to open this file).
- Go to EEE+ GrandCentral and log in with your UCI NetID
- Create a Canvas Sandbox space by going to the Canvas Sandbox section and clicking on “Create Sandbox”
- Give your Canvas Sandbox a name and click “Create Sandbox”
- Enter the Canvas Sandbox and click on the “Settings” tab in the left side menu.
- Click on the “Import Course Content” link on the right side menu.
- For Content Type, select “Canvas Course Export Package” in the drop down menu
- Then browse for the .imscc file that you downloaded in Step 1
- For Content, select “All Content”
- Click the “Import” button. The process may take a few minutes to complete.
- The template is now imported into your Canvas Sandbox
If you would like to import only sections of the template into your Canvas Course follow the instructions in the next section.
It is recommended to first import the Canvas Course template into a Canvas Sandbox before importing specific content into your Canvas Course. Follow the instructions in the section above to import the template into a Canvas Sandbox before proceeding with the instructions in this section.
Import Specific Content from the Sandbox (DTEI Canvas Course Template) to your Canvas Course
- Follow the directions in the section above to import the Canvas template into a Canvas Sandbox
- Go to the Settings section of your Canvas Course
- On the right side menu click on “Import Course Content”
- For Content Type select “Copy a Canvas Course”
- For Search for a Course, Select the Canvas Sandbox that you imported the course template into
- For Content: “Select Specific Content”
- Click “Import”
- A blue button will appear that says “Select Content”
- Select the specific content you want to import from the template to your course and click “Import”
Best Practices in using the Template
We recommend you to view the Canvas template (10-Week | 5-Week) before downloading and importing it to your Canvas course space. Please expand each section below to learn about the different tools and resources that you can find in the template. All of the components listed below can be accessed by going to the Modules section of the Canvas Course Template.
This section contains links to useful resources for setting up an accessible syllabus, teaching and learning resources, links to technology support and visual design tools. The syllabus template (in Microsoft Word format) in this section is set up to be accessible so you can use this template for your syllabus. It also contains sample verbiage that you can copy and paste into your syllabus. Please make sure to keep this module unpublished, or delete this section before you publish the course for your students.
This section contains all of the different Canvas Page Templates that can be used and modified for your course:
- Three Homepage Designs: Choose between a Module Navigation Design, Weekly Navigation Design, and a more Flexible Navigation Design.
- Office Hours Page: A page dedicated to office hours for you and your TAs.
- Getting Started Page: A page with resources for how students should get started with your course. This can be part of a Getting Started Module or stand alone and be linked to the “Start” button on the homepage.
- Weekly Roadmap: A sample weekly roadmap page that can be used at the beginning of each week or module to orient students on what to expect and accomplish each week.
- Readings & Other Materials: A page dedicated to weekly readings and other learning content. This type of page is useful when you have a large amount of learning content or would like to attach guided questions or activities to go with the learning content.
- Lecture Videos: A page where you can embed all of your lecture videos. This page requires use of HTML to replace the Yuja video links. If you need help modifying this page, please contact an instructional designer.
- Emergency Resources Page: To ensure educational continuity consider setting up an emergency resources page that contains information regarding what to do if there is a campus or state-wide emergency. This template provides sample verbiage and ideas on how you can approach emergency situations.
To learn how to edit the components in each of these pages, scroll down to the “Editing the Template” section of this webpage.
This is a sample Week 0 or Getting Started Module that you can include in your course to get students ready for taking your course. You can link this module to the “Start” button on your homepage so students know to complete this first. Items that you may want to consider adding in the Getting Started Module include:
- How to Get Started Page
- Course Syllabus
- Student Meet and Greet / Introductions / Icebreaker Discussion Board
- Office Hours Page
- About the Instructor Page
- Emergency Resource Page
- Pre-Course Surveys:
- What are your Learning Expectations Survey: Instructors are encouraged to be mindful of how we can help all students succeed. One of the best ways to learn what your students need is to ask them. This survey helps instructors learn more about their students’ learning needs and ways in which we can preemptively prepare them for your course and help them succeed.
- Pre-Emergency Contact Information Survey: An emergency can occur at any time during your course. The pre-emergency contact information survey encourages students to share emergency contact information in case you are unable to reach them in the event of an emergency.
There are Sample Modules in this template to give you an idea of how you may consider structuring your course modules:
- Sample Week 0 or Student Orientation Module: An example of a module to help students get started with the course. Other ideas to include in this module include: Course Policies, Instructor/TA Introductions, Icebreaker Discussion Board, General Q&A Discussion Board, Course Technology Requirements & Guides, Online Learning Resources, Emergency Preparedness.
- Sample Module I: Optimized for Flipped/Hybrid Courses where tasks are organized by what to do before class, during class and after class
- Sample Module II: Suitable for Online Asynchronous courses where tasks are not completed in a specific order, but are organized by type of content to complete for the week (Readings, Lectures, Assignments, Quizzes, etc…)
Editing the Template
This course template contains several Canvas pages with pre-made layouts that you can include in your course, such as three home page designs, a weekly road map page, and pages to help you organize your lectures and readings. If you go to the Modules section of the the Canvas Template you will find a Module called “Page Templates” where you can see all of the available page designs.
Home Page
The course home page serves as the initial entry point into your course and helps to orient students to what they need to know and how they should navigate your course.
There are three home page designs in this course template for you to select from
- Module Navigation Design – For instructors that would like to organize and have students navigate content by topic
- Weekly Navigation Design – For instructors that would like students to navigate the course week-by-week
- Weekly/Module Flex Navigation Design – For a more simplistic homepage and navigation that can be customized by module or week
Once you’ve decided on a home page, you will need to set it as the front page of your course. Follow Canvas’ instructions on how to set a front page in your course.
The following elements are built into the page and can be modified:
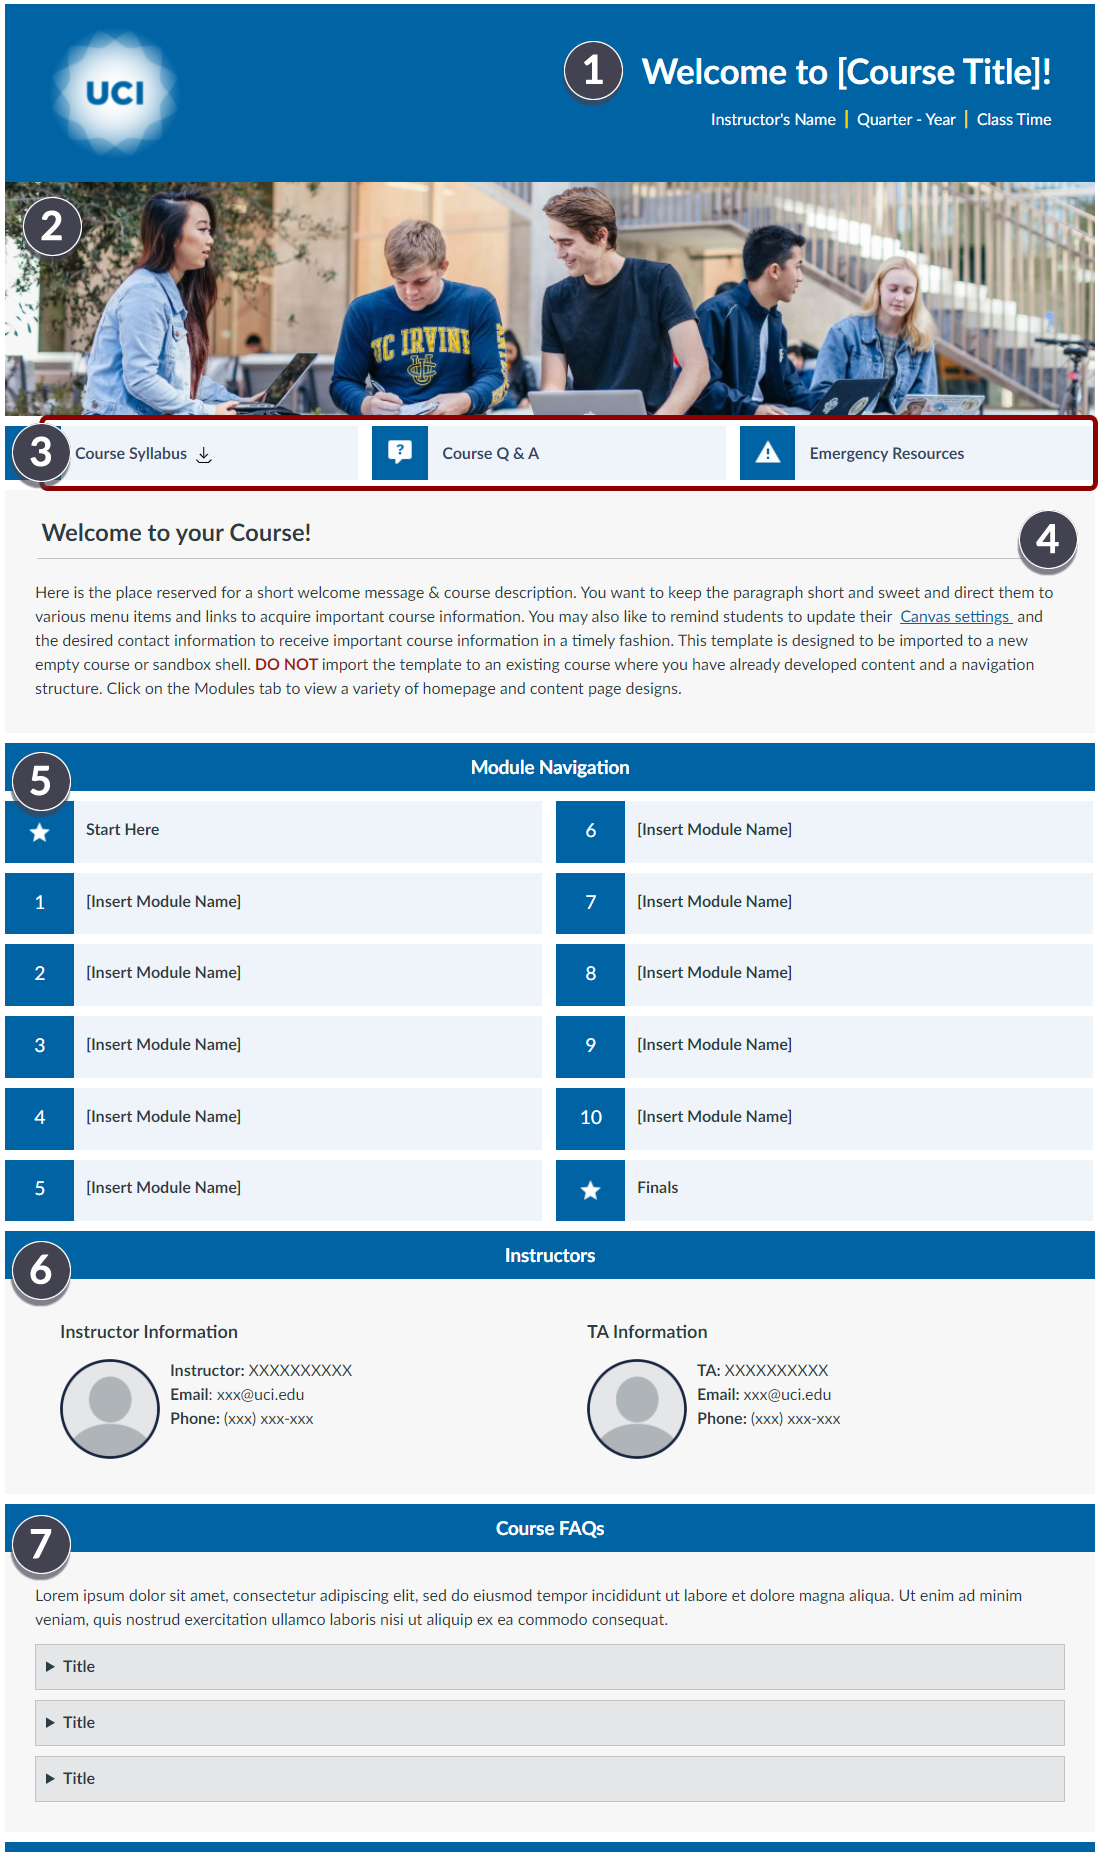
[1] Course Header: Course Title, Instructor’s Name, Course Quarter and Year, and Class time should be updated.
[2] Course Banner: The banner image of this page can be changed by clicking on the banner image and then clicking “Insert → Image.” Try to choose an image that is wide and short)
[3] Quick Buttons: Depending on the home page design you select, there are quick buttons along the top or the left side of the page. Button text can be modified and linked to any page or item inside or outside of Canvas. Button icons are just images that can be replaced and resized to 25×25 by dragging the corner of the image.
[4] Welcome Message: Update the text in this section with a welcome message or description of your course. You may want to indicate here the learning format of your course (hybrid, synchronous/asynchronous online, in-person, etc…).
[5] Navigation: Depending on the home page design you select, you can customize the text in the navigation buttons. If you choose the module navigation design you can add module topic names to each button. Link these buttons to Canvas Pages or to Canvas Modules
[6] Instructor Information: For homepage designs that have an instructor information box, you can replace the placeholder image with your own image (or remove it) and change the text within the box. You may want to provide your contact information and possibly your office hours here
[7] Course FAQs: For homepage designs that have a Course FAQs box, there are three accordion menus that open to reveal more text. You can place a question in the Title area and answer in the placeholder text below. You can easily delete accordion menus, but cannot easily add them back. You may also customize this box to be whatever you would like, it does not need to be Course FAQs.
Once you’ve decided on a home page, you will need to set it as the front page of your course. Follow Canvas’ instructions on how to set a front page in your course.
As you edit the page, please keep in mind:
- Text content within each page design can be edited using the rich-text editor; however the structure and look and feel of the page is fixed
- Images and Icons such as the banner image and icons next to buttons can be swapped out with your own images and icons
-
- Websites for Copyright Free Images: Pixabay.com, Pexels.com, Unsplash.com
- Website for Copyright Free Icons: https://materialdesignicons.com/
-
- If you hit the delete button too many times, it is possible to break the design/structure of the page. Use the undo button (ctrl. Z on Windows and Command Z on Mac to undo changes you made)
- Save frequently! You can always go to the three dots at the top of right the page and view the page history to go back to a previous save.
Office Hours Page
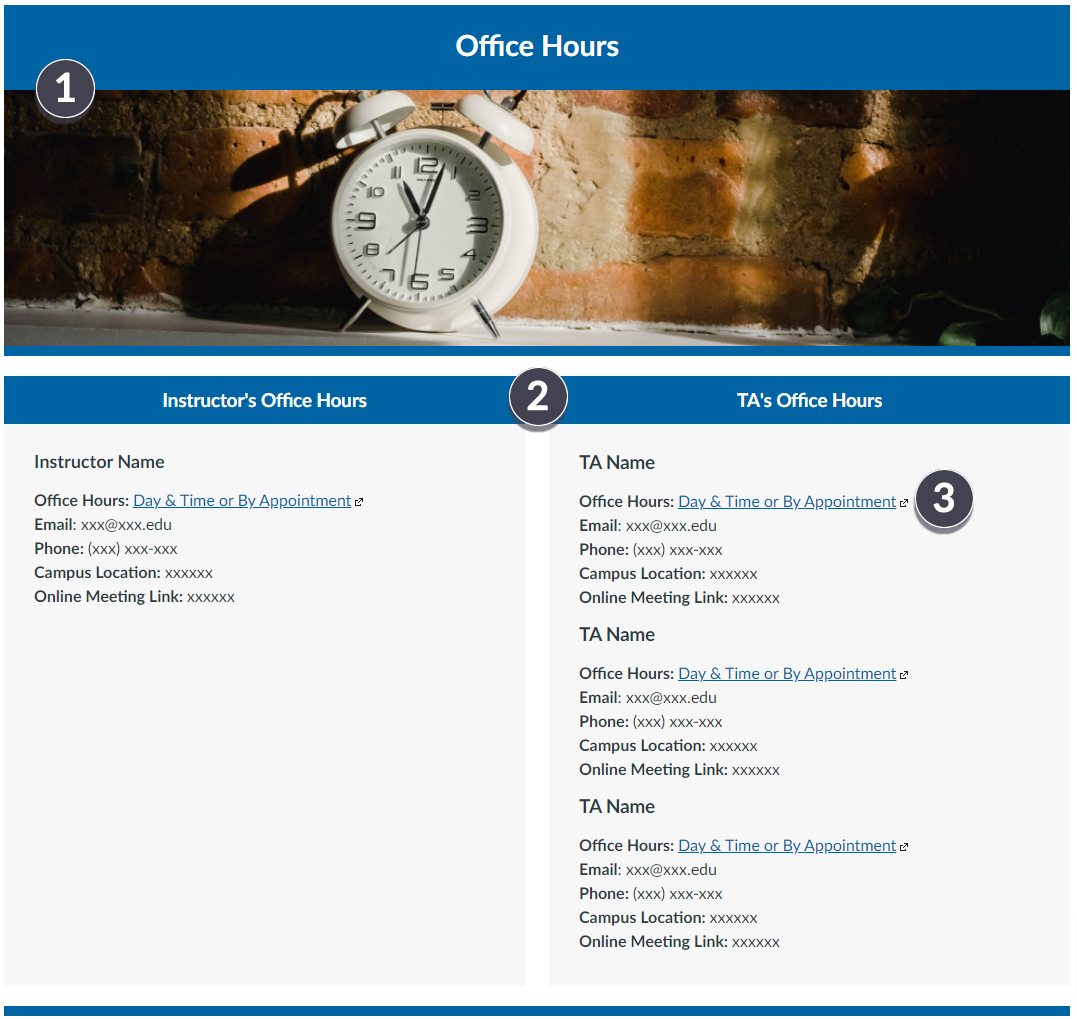
You can use this office hours page to organize instructors’ office hours, particularly if you have several TAs that will all be offering separate office hours
The following elements are built into the page and can be modified:
[1] The banner image of this page can be changed by clicking on the banner image and then clicking “Insert → Image.” Try to choose an image that is wide and short.
[2] You may want to consider including thumbnail pictures of yourself and your TAs for a more personable feel.
[3] Consider offering more flexibility by offering several day/time slots and using an online scheduling service to allow students to self-schedule.
- Online Schedulers:
- Calendly Scheduling Platform
- Google Calendar Appointment Slots
As you edit the page, please keep in mind:
- Text content within each page design can be edited using the rich-text editor; however the structure and look and feel of the page is fixed
- Images such as the banner image can be swapped out with your own banner image
-
- Websites for Copyright Free Images: Pixabay.com, Pexels.com, Unsplash.com
-
- If you hit the delete button too many times, it is possible to break the design/structure of the page. Use the undo button (ctrl. Z on Windows and Command Z on Mac to undo changes you made)
- Save frequently! You can always go to the three dots at the top of right the page and view the page history to go back to a previous save.
Getting Started Page
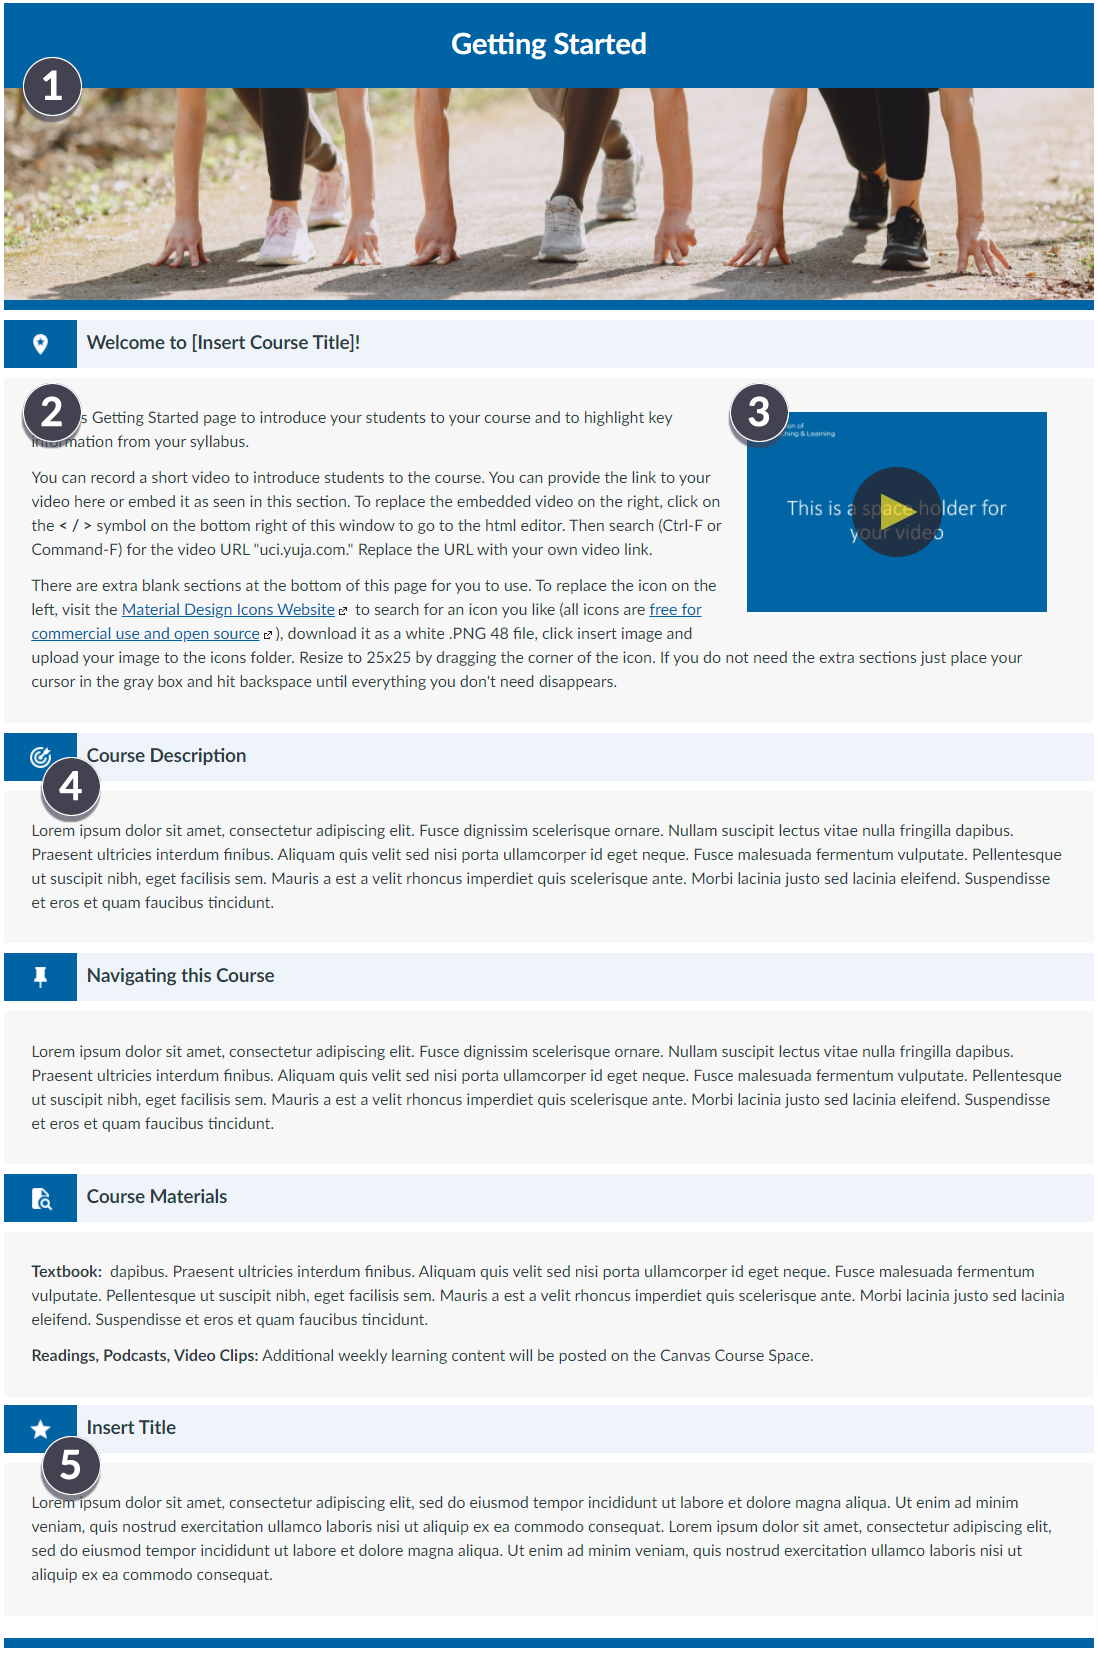
You can use this Getting Started page to introduce your students to your course and to highlight key aspects of your syllabus. Ideas for sections to include and some sample verbiage to use are listed on this page. This page can work as a standalone Getting Started Page, or can introduce students to a Getting Started Canvas module. All text can be deleted or edited using the rich text editor.
The following elements are built into the page and can be modified:
[1] The banner image of this page can be changed by clicking on the banner image and then clicking “Insert → Image.” Try to find a wide image that will better fit the width of the page.
[2] Use this section to welcome your students to your course and include a personal message or description of the course.
[3] You may want to record a short video to introduce students to the course. You can provide the link to your video here or embed it as seen in this section. To replace the embedded video on the right, click on the < / > symbol on the bottom right of this window to go to the html editor. Then search (Ctrl-F or Command-F) for the video URL “uci.yuja.com.” Replace the URL with your own video link.
[4] Each section of this page is denoted by an icon followed by a section header. For accessibility purposes please make sure to set each header to a Heading 3 style. The icon is just an image that can be replaced. To replace the icon, visit the Material Design Icons Website to search for an icon you like (all icons are free for commercial use and open source), download it as a white .PNG 48 file, click insert image and upload your image to the icons folder. Resize to 25×25 by dragging the corner of the icon.
[5] There are extra blank sections at the bottom of this page for you to use. If you do not need the extra sections just place your cursor in the gray box and hit backspace until everything you don’t need disappears.
As you edit the page, please keep in mind:
- Text content within each page design can be edited using the rich-text editor; however the structure and look and feel of the page is fixed
- Images and Icons such as the banner image and icons next to buttons can be swapped out with your own images and icons
-
- Websites for Copyright Free Images: Pixabay.com, Pexels.com, Unsplash.com
- Website for Copyright Free Icons: https://materialdesignicons.com/
-
- If you hit the delete button too many times, it is possible to break the design/structure of the page. Use the undo button (ctrl. Z on Windows and Command Z on Mac to undo changes you made)
- Save frequently! You can always go to the three dots at the top of right the page and view the page history to go back to a previous save.
Weekly Roadmap Page
The weekly roadmap page gives students a quick guide through this week’s learning content. You may want to include a weekly introduction video, learning objectives, class materials for the week, and what needs to be completed. This page can work as a standalone page for each week’s learning content, or can act as an introductory page to a Canvas Module. All text can be deleted or edited using the rich text editor.

The following elements are built into the page and can be modified:
[1] The banner image of this page can be changed by clicking on the banner image and then clicking “Insert → Image.” Try to find a wide image that will better fit the width of the page.
[2] In the overview section you may want to provide an introduction to this week’s topic. What is the purpose or importance of the topic? How does it connect with the larger curriculum?
[3] You can also record a short video to introduce students to this week’s topic. You can provide the link to your video here or embed it as seen in this section. To replace the embedded video on the right, click on the < / > symbol on the bottom right of this window to go to the html editor. Then search (Ctrl-F or Command-F) for the video URL “uci.yuja.com.” Replace the URL with your own video link.
[4] Each section of this page is denoted by an icon followed by a section header. For accessibility purposes please make sure to set each header to a Heading 3 style. The icon is just an image that can be replaced. To replace the icon, visit the Material Design Icons Website to search for an icon you like (all icons are free for commercial use and open source), download it as a white .PNG 48 file, click insert image and upload your image to the icons folder. Resize to 25×25 by dragging the corner of the icon.
[5] There are extra blank sections at the bottom of this page for you to use. If you do not need the extra sections just place your cursor in the gray box and hit backspace until everything you don’t need disappears.
As you edit the page, please keep in mind:
- Text content within each page design can be edited using the rich-text editor; however the structure and look and feel of the page is fixed
- Images and Icons such as the banner image and icons next to buttons can be swapped out with your own images and icons
-
- Websites for Copyright Free Images: Pixabay.com, Pexels.com, Unsplash.com
- Website for Copyright Free Icons: https://materialdesignicons.com/
-
- If you hit the delete button too many times, it is possible to break the design/structure of the page. Use the undo button (ctrl. Z on Windows and Command Z on Mac to undo changes you made)
- Save frequently! You can always go to the three dots at the top of right the page and view the page history to go back to a previous save.
Readings & Other Materials Page
You can use this readings and other materials page to list your course content and readings. This can be particularly useful if you have a lot of weekly course content. Rather than listing all content in your Canvas modules and creating a very long modules page, you can organize all of your weekly content into separate pages and just add the weekly readings page to your weekly modules. All text on this page can be deleted or edited using the rich text editor.

The following elements are built into the page and can be modified:
[1] The banner image of this page can be changed by clicking on the banner image and then clicking “Insert → Image.” Try to find a wide image that will better fit the width of the page.
[2] You can use the first text section of this page to explain this week’s course materials. How do they tie in with this week’s topic? What perspectives do they offer? How should students use the guiding questions to support their reading? What other reading strategies do you recommend?
[3] Each reading or learning content will have its own section denoted by an icon. Each icon represents a different type of content (textbook, podcast, video, website, newspaper, journal article, etc…). You can copy and paste the different icons into different sections as needed.
[4] Use the text editor to edit and link the learning content into each section. Remember to use descriptive text/titles rather than just straight URLs
[5] Each section also has a placeholder area for guiding questions that you may want to include with each content item. Guiding questions help students focus on the most important aspects of the learning content and emphasizes what you want students to think about as they review the content.
[6] There are additional sections at the bottom of this page for you to use. If you do not need the extra sections just place your cursor in the gray box and hit backspace until everything you don’t need disappears.
As you edit the page, please keep in mind:
- Text content within each page design can be edited using the rich-text editor; however the structure and look and feel of the page is fixed
- Images and Icons such as the banner image and icons next to buttons can be swapped out with your own images and icons
-
- Websites for Copyright Free Images: Pixabay.com, Pexels.com, Unsplash.com
- Website for Copyright Free Icons: https://materialdesignicons.com/
-
- If you hit the delete button too many times, it is possible to break the design/structure of the page. Use the undo button (ctrl. Z on Windows and Command Z on Mac to undo changes you made)
- You can delete any sections that you do not need
- Save frequently! You can always go to the three dots at the top of right the page and view the page history to go back to a previous save
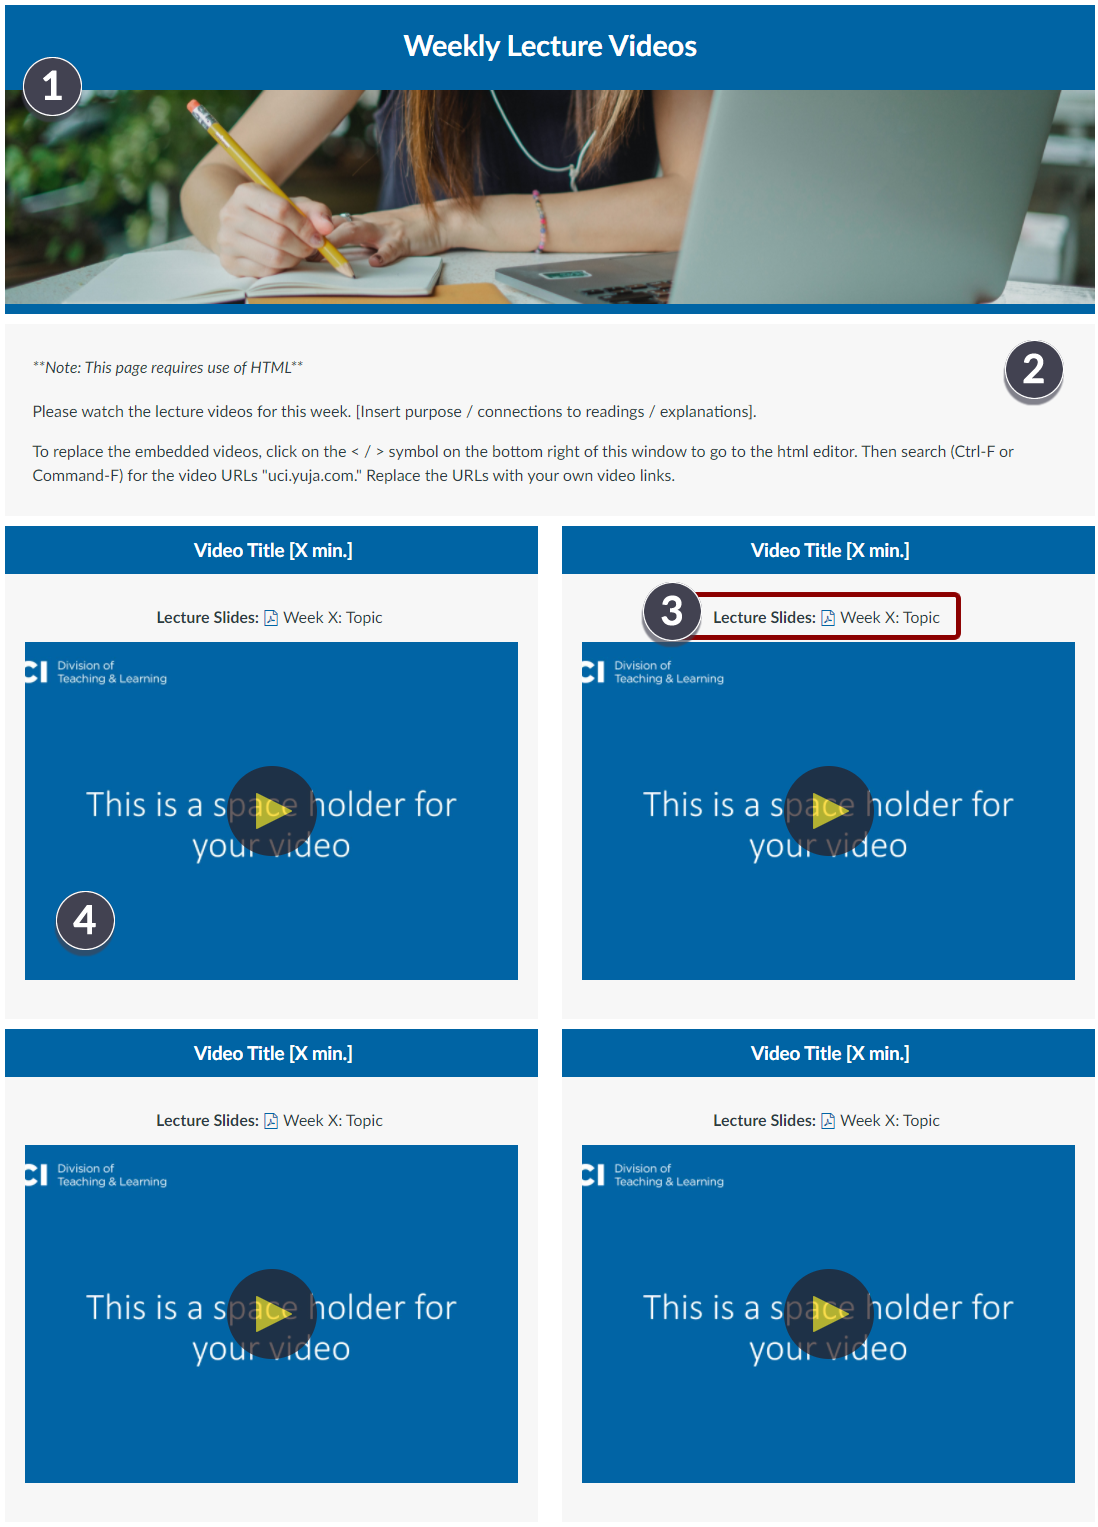
Lecture Videos Page
**Note: this page requires use of HTML**
You can use this lecture videos page to embed all of your lecture videos. This can be particularly useful if you have a lot of weekly lecture videos. Rather than listing all the videos individually in your Canvas modules and creating a very long modules page, you can organize all of your weekly lectures into separate pages and just add the weekly lecture videos page to your weekly modules. All text on this page can be deleted or edited using the rich text editor.
The following elements are built into the page and can be modified:
[1] The banner image of this page can be changed by clicking on the banner image and then clicking “Insert → Image.” Try to find a wide image that will better fit the width of the page.
[2] Use this section to provide instructions related to how students should approach the lecture videos and slides. Is there a sequence they should follow? You may also want to insert the purpose of the lectures and connections to the week’s readings.
[3] You can use this section to insert your lecture slides. Remember to use descriptive text rather than just the URL to your slides. There is a PDF icon before the lecture slide title that can be adjusted in the HTML. Remove class=”icon-pdf” from the code to remove the icon.
[4] To replace the embedded videos, click on the < / > symbol on the bottom right of this window to go to the html editor. Then search (Ctrl-F or Command-F) for the video URLs “uci.yuja.com.” Replace the URLs with your own video links.
You can delete any sections that you do not need. If you need to add sections go to the HTML editor and copy everything from <div class=”grid-row”> to </div></div></div> and paste it at the bottom of the code
As you edit the page, please keep in mind:
- Text content within each page design can be edited using the rich-text editor; however the structure and look and feel of the page is fixed
- Images and Icons such as the banner image and icons next to buttons can be swapped out with your own images and icons
-
- Websites for Copyright Free Images: Pixabay.com, Pexels.com, Unsplash.com
- Website for Copyright Free Icons: https://materialdesignicons.com/
-
- If you hit the delete button too many times, it is possible to break the design/structure of the page. Use the undo button (ctrl. Z on Windows and Command Z on Mac to undo changes you made)
- Save frequently! You can always go to the three dots at the top of right the page and view the page history to go back to a previous save.
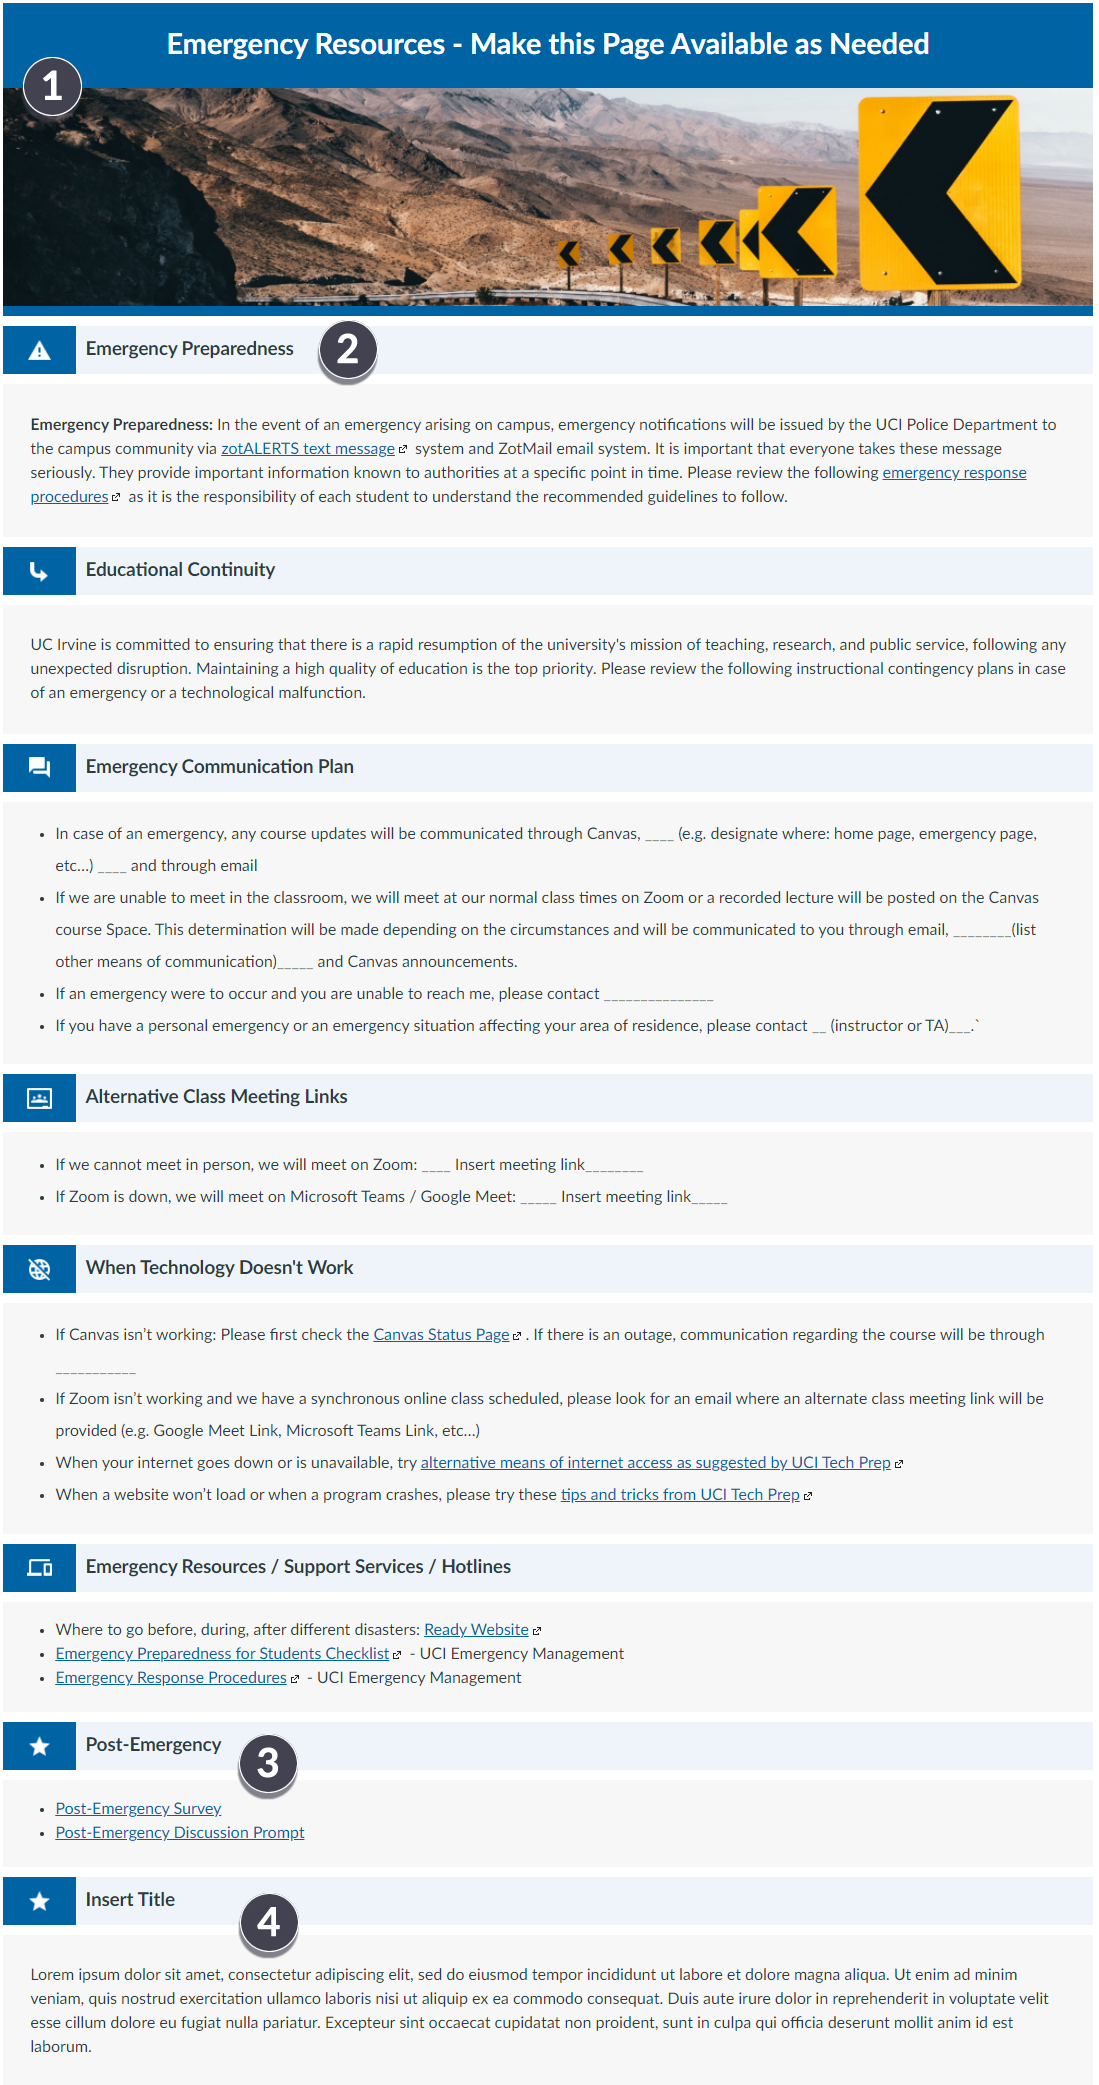
Emergency Resources Page
Use this emergency resource page to guide students and ensure educational continuity in case of a campus or community emergency. You may want to include an emergency communication plan, alternative class meeting links, and campus support services. Ideas for sections to include and some sample verbiage to use are listed on this page. This page can be prepared ahead of time and made available only when needed. All text on this page can be deleted or edited using the rich text editor.
The following elements are built into the page and can be modified:
[1] The banner image of this page can be changed by clicking on the banner image and then clicking “Insert → Image.” Try to find a wide image that will better fit the width of the page.
[2] Each section of this page is denoted by an icon followed by a section header. For accessibility purposes please make sure to set each header to a Heading 3 style. The icon is just an image that can be replaced. To replace the icon, visit the Material Design Icons Website to search for an icon you like (all icons are free for commercial use and open source), download it as a white .PNG 48 file, click insert image and upload your image to the icons folder. Resize to 25×25 by dragging the corner of the icon.
[3] In the section called “Post-Emergency” there are two items for your consideration. 1) The post-emergency survey, adapted from Florida State University, inquires about students’ needs and ability to continue with coursework. This will help you understand the impact of the emergency on your students so that you can accommodate as needed 2) The post-emergency discussion prompt, also adapted from Florida State University, offers a safe space for students to discuss with their peers how the emergency has impacted them and to offer support. Please feel free to adapt these items to your course needs.
[4] There are extra blank sections at the bottom of this page for you to use. If you do not need the extra sections just place your cursor in the gray box and hit backspace until everything you don’t need disappears.
As you edit the page, please keep in mind:
- Text content within each page design can be edited using the rich-text editor; however the structure and look and feel of the page is fixed
- Images and Icons such as the banner image and icons next to buttons can be swapped out with your own images and icons
-
- Websites for Copyright Free Images: Pixabay.com, Pexels.com, Unsplash.com
- Website for Copyright Free Icons: https://materialdesignicons.com/
-
- If you hit the delete button too many times, it is possible to break the design/structure of the page. Use the undo button (ctrl. Z on Windows and Command Z on Mac to undo changes you made)
- Save frequently! You can always go to the three dots at the top of right the page and view the page history to go back to a previous save.
If you have any questions about how to effectively implement the course template into your course or would like to further customize the design, please reach out to the DTEI Instructional Design team by setting up an office hour or emailing us at dteisupport@uci.edu.
Content retrieved from: https://digitallearning.dtei.uci.edu/homepage/online-course-development/build/template/.